Saturday, October 24, 2015

Using "Copy and Edit" in SeeSaw in 3rd Grade Math

I started using Smart Goals with my staff this month. I got the idea from Ms. Boone- she uses it on her campus and it is an excellent way to help grow staff! Anyways, the Smart Goal that I gave to this 3rd Grade Math teacher was to use the "copy and edit" tool in SeeSaw. The way Smart Goals work on my campus is that I give them a tool or app to explore- they will have 1 month to use that tool on their own. If they need assistance, I will certainly help them! Once they meet their Smart Goal I will make them a certificate in which they can post outside their door to show everyone that their goal was met.

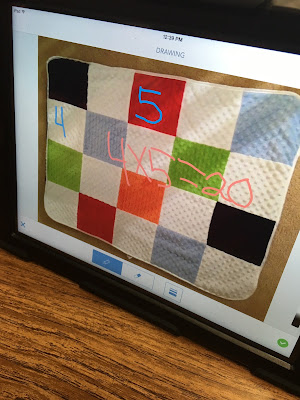
Anyways, in planning, the teacher told me that she had an idea that she wanted to use with "making arrays." She put together this Google Doc in which there were a few arrays in which students could download and insert into Explain Everything via a QR code. As far as the content (multiplication) went, she used the "Copy and Edit" feature in SeeSaw to help explain this type of concept. This was actually big news because she was the first one in our district to use this feature! The cool thing about it was the fact that she just dove right into using this tool and was like, "Well, if this is my Smart Goal, I am just going to do it!" Once the student copies the image, it will automatically copy into their portfolio in which they can then annotate, record and type on! Congrats to this teacher! So proud of you!!

Here is an example of an item that was copied and pasted from the teacher.


Here are examples of a finished product:


3rd 4th and 5th Graders Meet Makey Makey

This year at our school's Science / Technology Fair we added "Technology" to the list of things students can include in their project. We also purchased 3 "Makey Makey's" that can be used for the fair as well. I chose 3 students from 3rd, 4th and 5th Grade in which I formed a "Discovery Group." Basically this group will be the ones that create things with the Makey Makey. This past week these students were introduced to the Makey Makey. They watched a few resource videos in which they learned how to use it and how the connections work. Personally I had never used this device before so I was learning along with the students! My 4th and 5th grade students will be wearing a Go-Pro camera so that they can document their process. Unfortunately I didn't charge the Go-Pro for my 5th graders, but 4th grade was able to use it! Students made a "to do" list of things they need to complete within 4 weeks! I cannot wait to see what the students create!


"Types of Energy" Scavenger Hunt (Part 1)

A year ago, the 4th grade teacher that I work with and I did this same activity. However, a year later, this teacher realized how much she could improve the activity and how to really challenge the students! For this 2-part activity (we hadnt done the second part yet) students had to go on a scavenger hunt around the school building and look for "types of energy." The types of energy they were looking for consisted of mechanical energy, sound energy, thermal energy and others. Students were given 15 minutes to find these items around campus. Students were also placed in groups in which they had jobs- one was the "photographer" and the other was the "editor" in which they created the collages. Once they found these items, they had to build a Pic Collage in which they had to label what type of energy the picture represented. To set the expectations, this teacher used a rubric. Students really appreciated this rubric because it explained step by step on how to earn a certain grade. Part 2 is coming up next week in which students will use Thinglink to explain their creations. Be on the look out for a blog post!!


Background Knowledge + Text Clues = Inferences in 5th Grade!

I am so proud of my 5th Grade ELA Teacher! She is new to integrating technology into her classroom this year, but she is doing really well in adapting findings ways to do so! Students were learning about "making inferences" in 5th Grade ELA. They were learning about what components are used to make inferences as well. In planning the teacher immediately told me that she wanted to use Popplet as a graphic organizer to help "visualize" their thoughts. When students were done with their work, they added their items into their SeeSaw Journal!


Up Up and Away! 1st Grade T Creates Her Own Nearpod!

One of the teachers that I work with told me that she wants to get really good at creating Nearpods for her and her students! If you havent created one before it can be kind of intimidating! Usually you can create them in Power Point or GSlides, but if one wants to use an "activity slide" they will have to export them as .Jpg files. Needless to say, there are quite a few steps to making them. Earlier this week the teacher walked into my room and said "Hey Chavez! I created my own ELA Nearpod!" I was so excited that she did it all on her own!!  Immediately I went over to check out this awesomeness and couldn't believe what I saw!! I asked her if she needed help converting certain slides to .Jpgs so that she could add them as "activity slides." She was like, "Nah! I got this!"

When she told me that she was going to run it on Friday, I was really excited, yet nervous because tons of stuff could have gone wrong! I went in early and got them all on the Nearpod app for her and she did the rest! It went well for the most part, however the internet kept dropping cause the hotspot in her room was dead. Needless to say, she saved the template and will be using them in the future! So proud of her!!


Thursday, October 15, 2015

Observing Changes

One of the 2nd grade teachers on my campus has been really eager to use Thinglink this year. However, we talk about it in planning, it just never seemed to fit what we were doing. However, this past week when we planned, we finally found a good use for Thinglink! Learning from past activities, we were going to set goals and pace the class to do smaller chunks of the activity over time, rather than try and rushing through everything and possibly miss the chance of a learning opportunity.

Day 1- Teacher took students outside and put milk in a pot on a hotplate. He also put soap in a pot and put that on a hotplate as well. He took pictures as the state the item changed.  (Me and him then created a google doc in which he uploaded these photos. He then created a QR code in which students could scan and access the pix.)

Day 2: Students scanned the QR code to access the pix and downloaded them to the camera roll. Once they were saved, students created a pic collage with them and put their name on the collage. This was the end of the activity for the day! (As tempted as we were to continue the project, we knew that students would run out of time, so we decided to stay with the original plan!!)

Day 3: Students uploaded their image to Thinglink and identified what had happened before/during/after their item had melted. Once they were done with that, they uploaded their Thinglinks into Seesaw!

Check out some examples:


Thinglinkin' it Up 4th Grade!

So the 4th grade teacher that I work with REALLY likes using Thinglink! As a matter of fact, our friends at Thinglink gave us a free 14-day trial of Thinglink Educator in which we got to take advantage of many of the features that the Thinglink Educator has to offer! We spread this particular assignment out over the course of 2 days  5 days due to the fact that we wanted to roll out student Google Accounts out. We also experienced some tech glitches on the back end of Thinglink, but we got all of them worked out. The first day, the task was for the student to take a picture of ocean water (sand) and salt water and make a pic collage out of them. The second day, they had to put their collages into Thinglink and talk about the similarities and differences of each and also recorded their observations on what they noticed between the two types of water. When starting this activity, we wanted to collaborate with another campus in which we would look at each others projects to see if there were any similarities / differences. We used SeeSaw to create a combined class and see each of the classes projects.

Here are some examples:


Wednesday, October 7, 2015

The Start of Something Beautiful

The First Grade teachers that I work with are having students do word sorts on the iPad now. I am creating the first few sorts for the teachers, however in a few weeks, we are going to turn that role over to the students. A few "fast finishers" will make the sorts for the class- this includes taking a screen shot of the sort, importing it, tracing each word/picture, putting it under a column and then saving it to the Google Drive.

Today was their first day in which our teacher went above and beyond! Instead of just having them move words under the correct categories/columns, she had them record their voice saying it while moving it! There was something beautiful about hearing students trying to say the word(s)! Often times you can hear the uncertainty in their voice, however over time they will become stronger in pronouncing these words! I look forward to seeing how students progress with this in the future.

Below is an example:


Thursday, October 1, 2015

Solids and Liquids and iPads Oh My!

Today in 2nd Grade, the teacher did a really fun activity in which they explored solids and liquids. #flashback Last year we did a similar activity but when we sat down to plan it out this year, we noticed that there was so much more we could do with it! The teacher wanted students to identify solids and liquids by taking a picture of them and labeling them. Side note- I totally freaked out when I walked in and saw baggies of water on their desk! iPads + water are not really a good idea! However, the students were responsible and kept the devices away from their bags of water.

Once students were done taking pictures, they smashed it into Explain Everything had to explain why a certain object was a solid or liquid. I was really impressed with this class! They did all this work in only 30 minutes! Our goal for next time would be to have students take pictures and label on one day, and then record on the next.

Check out the examples below: